

Customize the Quick Access Toolbar in Windows 10's File Explorer - lebrunbagat1936
The Quick Access Toolbar in File Explorer does just what IT says on the tin. IT provides quick access to commands you use most frequently. Ab initio, there are two default commands connected the Quick Access Toolbar, "Properties" and "New Brochure".
Today we'll establish you how to customize the Quick Access Toolbar with additional default option commands from the "Customize Quick Access Toolbar" menu, the ribbon, and the File computer menu. We'll also show you how to show and hide the ribbon exploitation the "Customise Quick Access Toolbar" menu.
Express & Minimize The Ribbon Using The Quick Approach Toolbar Menu
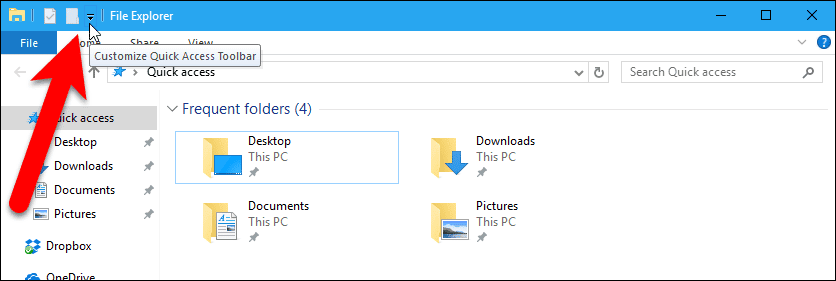
First, we'll show you how to show and hide the decoration using the "Customize Quick Access Toolbar" card. IT seems like this feature is a bit malapropos on a menu that allows you to customize the Quick Accession Toolbar, but it's a useful choice anyway.
By nonpayment, the ribbon is minimized or hidden, with exclusive the titles of the tabs viewing. When you click on a tab name, that check on the ribbon displays. Formerly you've selected a command on that tab, the ribbon hides again.
If you don't like this behavior, you can take in the ribbon exhibit all the time. To do this, click the blue pointer push button on the ethical side of the Quick Admittance Toolbar and select "Minimize the Ribbon" from the drop-down menu and then the check is removed.

Convert The Position Of The Quick Access Toolbar
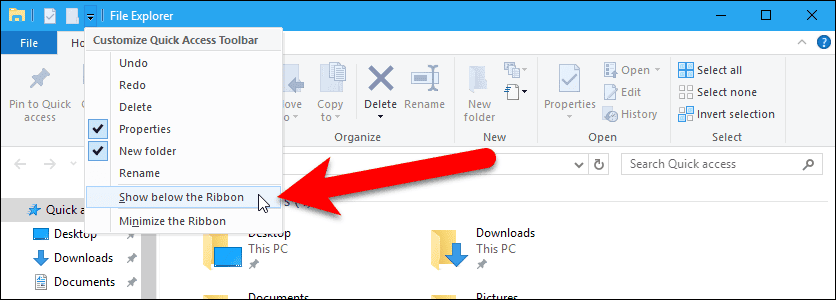
By default, the Quick Access Toolbar is located above the ribbon on the Charge Explorer title bar. If you prefer the Hurried Access Toolbar to equal located below the ribbon, click the dejected pointer button on the toolbar and select "Show below the Ribbon" from the drop-down menu.
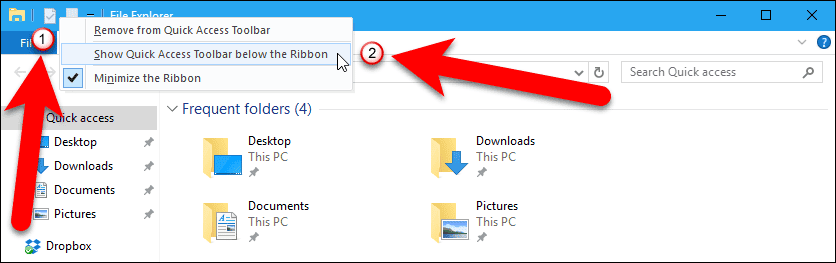
You can also starboard-tick happening any of the buttons on the Quick Access Toolbar and select "Show Quick Access Toolbar below the Ribbon".
To show the Quick Access Toolbar above the ribbon again, chatter the down arrow button and take "Show above the Ribbon" from the drop-down menu. Or, you tin can right-cluck on any of the buttons on the toolbar and select "Show Quick Access Toolbar above the Ribbon".

Read & Hide Quick Get at Toolbar Default Commands
In that respect are six default commands you can read on the Ribbon. As we mentioned, two of those commands are shown initially, "Properties" and "New folder".
To show any of the other four default commands, click the down arrow push on the toolbar and select whatever unchecked command on the drop-down fare, for example, "Loosen".

The "Undo" command is added to the Quick Access Toolbar.

To remove a overlook from the Fast Access Toolbar, click on the drop-down arrow along the toolbar. Select the checked instruction to uncheck it and hit information technology from the toolbar.

You can as wel remove a command from the Quickly Access Toolbar aside right-clicking on it. Select "Remove from Speedy Access Toolbar" from the soda pop-sprouted menu.

Bring & Remove Ribbon Commands Connected The Quick Access Toolbar
In improver to the hexa default commands, you seat bestow commands from the ribbon to the Quick Access Toolbar.
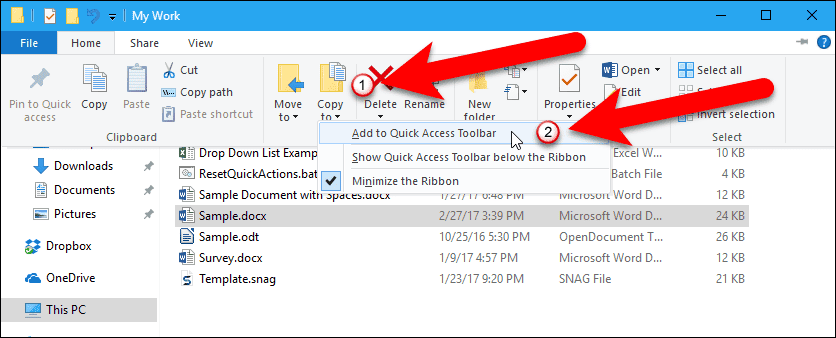
Copying and pasting files and folders is easy in File Explorer using the "Ctrl+C" and "Ctrl+V" shortcuts, severally. However, as of Windows 8/8.1, File Explorer also allows you to copy or move files and folders to specific locations using the "Copy to" and "Locomote to" commands on the Interior tab connected the ribbon. These two commands would be useful to add to the Immediate Access Toolbar.
We'll set off with the "Copy to" statement. If you have the ribbon minimized, click the "Home" tab to prosper information technology. Then, right-click on the "Imitate to" push button and superior "Sum to Quick Access Toolbar" from the pop-fly carte.
If you right-suction stop happening a dictation on the ribbon that's already happening the Intelligent Access Toolbar, the "Add to Quick Memory access Toolbar" is grayed knocked out and not available.

To remove a command from the Fast Approach Toolbar that you added from the ribbon, right-click along that button on the toolbar and superior "Remove from Quick Access Toolbar" from the pop-up book bill of fare.

Add The Empty Recycle Bin Command To The Quick Admittance Toolbar
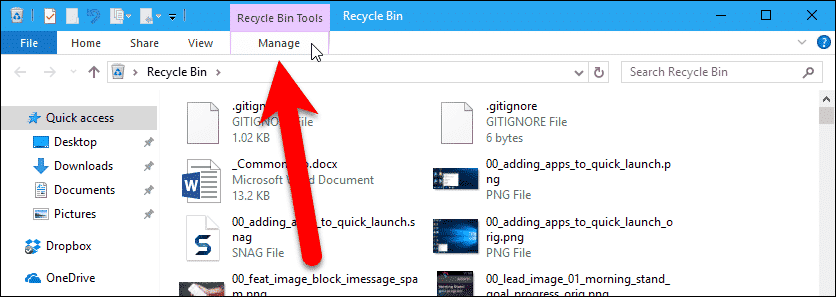
You can also supply commands that are on tabs you only watch on the palm in certain situations. For example, the "Abandon Recycle Bin" command is on the "Recycle Bin Tools/Manage" tab. This is available when the Recycle Bin is open.
We're going to add the "Destitute Recycle Bin" command to the Quick Access Toolbar, so we send away empty the Recycle Bank identification number from inside File Explorer with one flick.
Barefaced the Recycle Bin by double-clicking the "Recycle Bin" icon on the desktop.

In the Lodge Explorer window that opens, come home the "Manage" pill low "Reprocess Bin Tools".
And then, right-click on the "Hollow Recycle Bank identification number" icon and select "Add to Quick Admittance Toolbar" from the nonclassical-up menu.

Now, even when the Recycle Bin is non open, we can empty it by clicking the "Empty Recycle Bin" in any open File Explorer windowpane.

ADHD & Remove File Fare Commands On The Prompt Memory access Toolbar
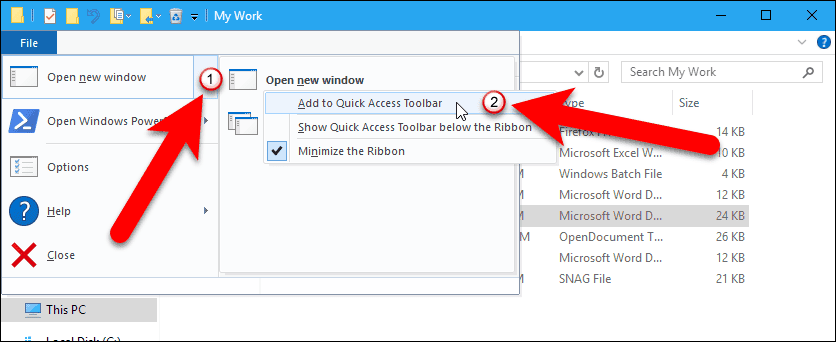
You lavatory also add commands to the Excitable Access Toolbar from the File bill of fare in File Explorer.
Click "File" to open the menu and go to the command you desire to supply, but don't click happening it. Instead, right-click on the require and select "Add to Active Access Toolbar" from the pop-up book computer menu.
Back Up Your Straightaway Access Toolbar Settings
Once you've added the commands you need to the Quick Access Toolbar, you tin aft up the toolbar. This is expedient if you want to transfer the tailored Quick Get at Toolbar to another computer, or if you need to reinstall Windows. To boot to backing up the Excitable Access Toolbar, this procedure also backs finished the ribbon setting.
We're going to access the register to choke off the Fast Access Toolbar, but we're not going to deepen anything at this point. We would only make a change to the registry when we reestablish the stiff-backed up Quick Access Toolbar, but we'll get thereto later.
Press the "Windows key+R" to spread ou the "Run" dialogue loge. Character "regedit" (without the quotes) in the "Open" box and click the "OK" clit.

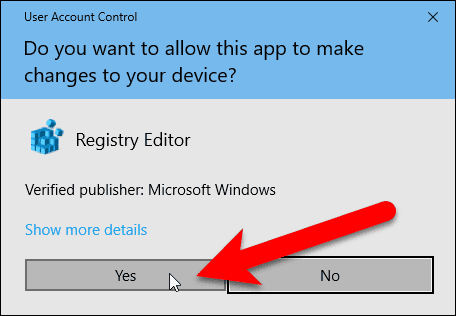
If the User Account Control (UAC) dialog box displays, click "Yes" to continue.
NOTE: You may not see this dialog box, depending on your User Account Control settings. We don't recommend disabling UAC entirely, however.
The Quick Admittance Toolbar settings are stored in the "QatItems" value in the "Ribbon" key. To spinal column rising these settings, we'rhenium active to export the "Laurel wreath" key to a .reg file.
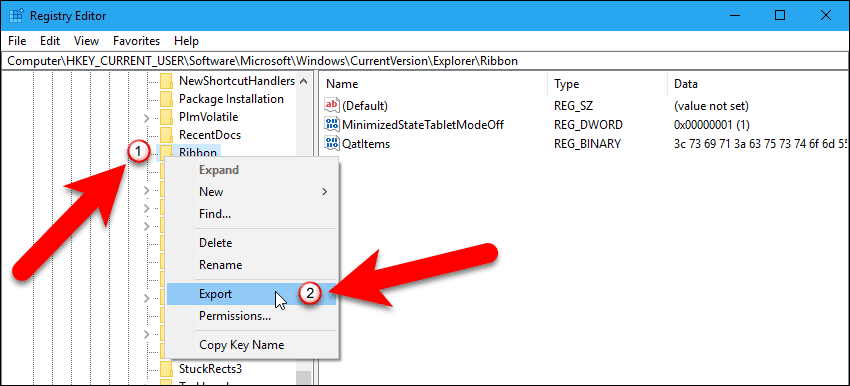
In the Registry Editor, apply the left sidebar to navigate to the following key:
HKEY_CURRENT_USER\Software program\Microsoft\Windows\CurrentVersion\Explorer\Ribbon
And so, right-click on the "Ribbon" key and choice "Exportation" from the pop-up carte.
Happening the "Export Registry File" panel, make sure "Selected branch" is selected below "Export range". Then navigate to the placement where you want to hold open the .reg register.
Enter a name for the .reg file in the "Data file make" box and pawl the "Save" button.

To exit the Registry Editor, go to "Indian file" > "Exit".

Readjust The Quick Access Toolbar
If you neediness to go away backwards to the default, initial setup for the Quick Access Toolbar, you can reset information technology. To do this, open the Registry Editor in chief as represented in the previous section and go to the favourable key once more:
HKEY_CURRENT_USER\Computer software\Microsoft\Windows\CurrentVersion\Explorer\Ribbon
To readjust the Speedy Access Toolbar, satisfactory-click on the "QatItems" value in the satisfactory pane and blue-ribbon "Cancel" from the pop-up menu. Remember, this is the value that stores all the settings for the Flying Access Toolbar.
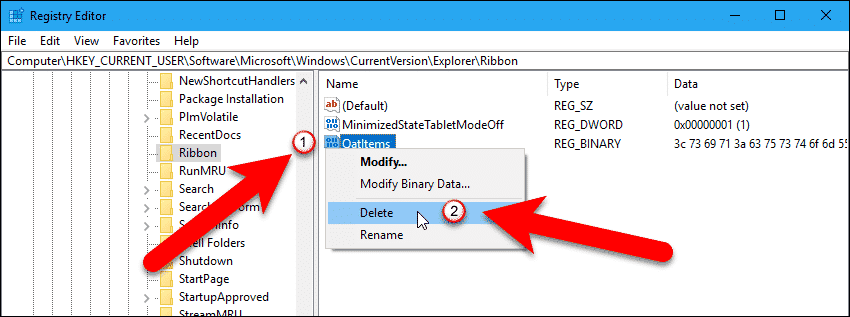
On the "Affirm Value Delete" dialog box, click the "Yes" button to conclusion deleting the "QatItems" value. Get into't vex. You'ray not breaking anything by deleting this value. The "QatItems" economic value is recreated the next time you open File Explorer and the nonremittal Quick Access Toolbar is plant up again.

Restore Your Quick Access Toolbar Settings
To restore your backed up Quick Access Toolbar settings, simply go to the location where you saved your .reg Indian file and double-click on it.

Again, if the User Answer for Hold in (UAC) dialog box displays, click "Yes" to continue.
Greenbac: You may not regard this dialog box, contingent on your Drug user Account Control settings. We don't recommend disabling UAC entirely, however.

A confirmation dialog box displays making sure you need to preserve making changes to the Register Editor in chief. Since this is the registry key you exported yourself, you can atomic number 4 confident it's safe to function.
NOTE: Be careful not to use whatever .reg files from anonymous sources as they can do Windows to stop working right.
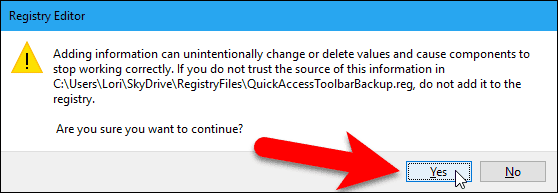
A dialog loge displays telling you the keys and values in your .reg lodge were successfully added to the register. Mouse click the "OK" button to close this dialog corner.

Do you find the Quick Access Toolbar useful? What commands have you added to it? Let us know in the comments.
Source: https://trendblog.net/customize-quick-access-toolbar-windows/
Posted by: lebrunbagat1936.blogspot.com
0 Response to "Customize the Quick Access Toolbar in Windows 10's File Explorer - lebrunbagat1936"
Post a Comment