

How To Clear Recents In Finder On Mac
Last Updated on May 31, 2021
How do you clear Recents on Mac without deleting them? How to remove files from Recents Mac? This tutorial is all about different methods to achieve the same goal: to remove Recents Folder from Mac Finder [M1 or intel Mac, MBP]. Like you can put the files by creating an Encrypted Drive or Hide the Startup Disk from Spotlight Search or Rename the File with a unique technique, or Group the files into a separate folder and apply few settings on it.
we are happy to help you, submit this Form, if your solution is not covered in this article.
Each below-mentioned technique has its advantages and disadvantages. Therefore, depending on your requirements, kindly refer to the one to hide the Recents folder in Finder on Mac.
How to Delete Recents Folder from Finder on Mac
What happens if I delete recents on Mac?
Clear from Recents means, Delete data from Mac. So, Here are few tricks that help in Hide New Finder window show recent files, and the Folder also Hide from Finder Sidebar under Favourites.
Deleting Recents on Mac is not recommended because it will directly take that item to the Trash instead of removing them from Recents. And even if you've mistakenly pressed the Empty Trash button, that File is long gone forever unless you try some hacks or use third-party recovery tools to get it back. Therefore, don't delete recents on Mac.
Method 1: Hide Recents from Finder Sidebar
if you do not agree with Recents will show in the Finder sidebar as a shortcut, then hide or Customize the finder sidebar. and Quickly hide Recents under Favourites. Follow the below steps,
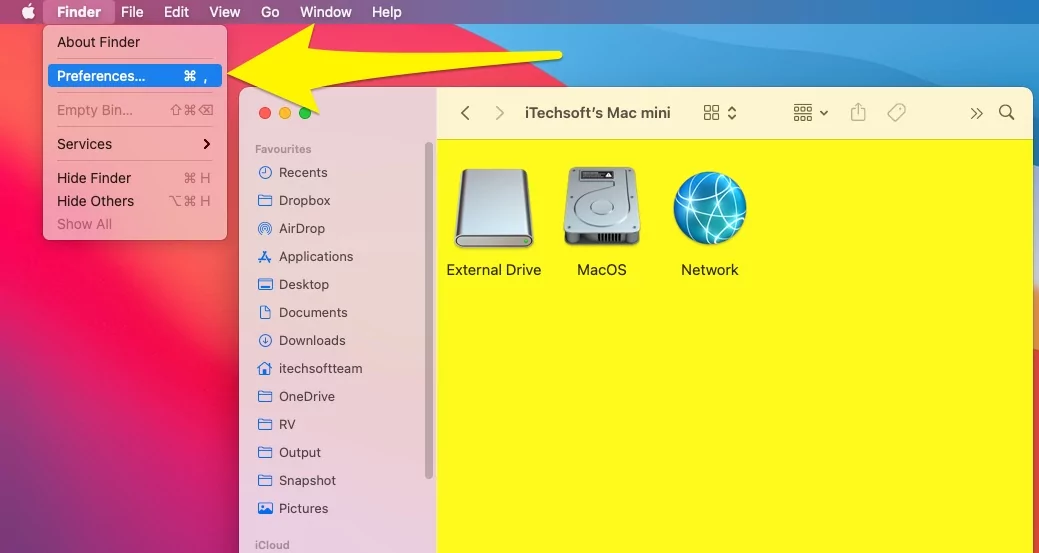
- Open Finder on Mac, Now, From top Mac menu > Finder > Preferences.
- Click on Sidebar Tab > Uncheck Recents option.
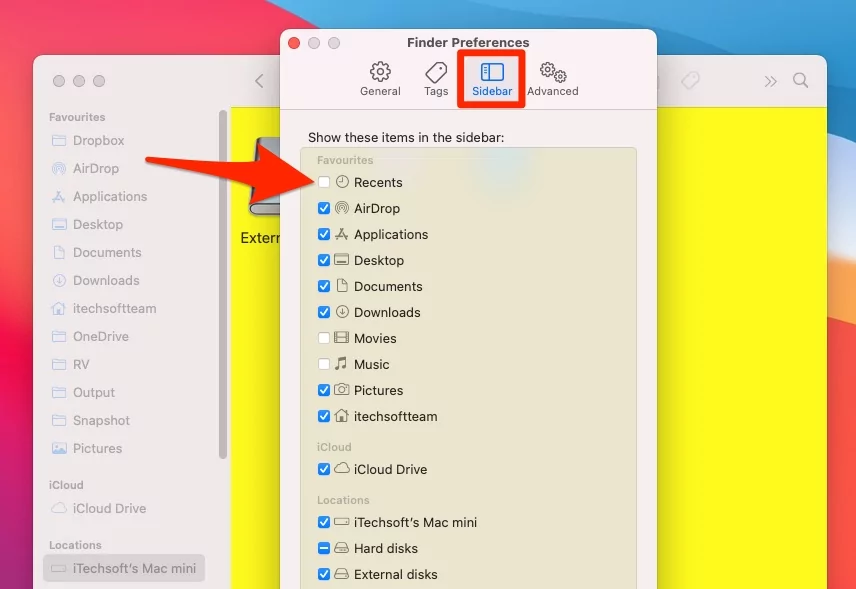
- That's it. Recent will be gone.
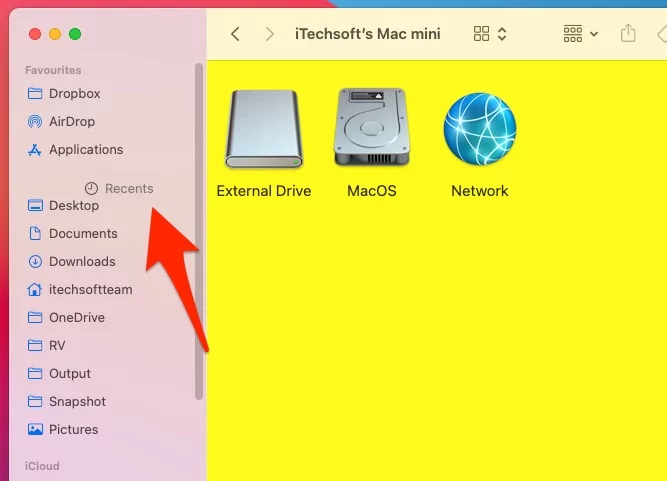
- if you put it in the sidebar but not in this order then, Drag the Recents into a new position.
- if you put it in the sidebar but not in this order then, Drag the Recents into a new position.
Method 2: Stop New Finder window show All recent files
as we know, Finder will stay open on your Mac to Quickly Open files and folders. Mac users can customize the New Finder window that shows All recent files.
here are steps to change the default finder view,
- Open Finder on Mac, Go to top Mac menu > Finder > Preferences.
- Click on General Tab. Select Other Option or Browse the folder to Keep showing when new finder windows option.
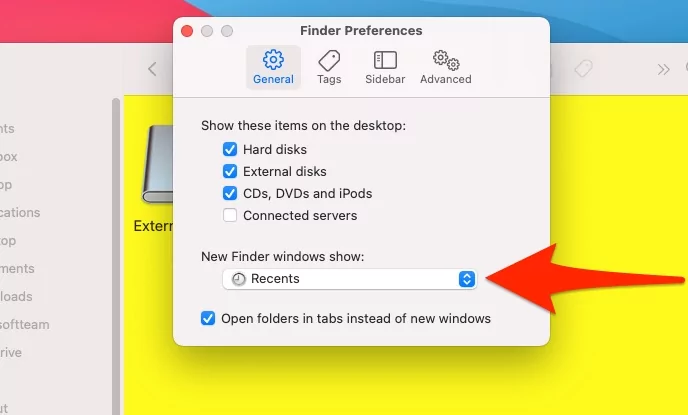
Change from recent to Volume Drive, Desktop, and more options.
Method 3: Hide Startup Disk from Spotlight Search
Spotlight search can be called a universal program added by Apple for Mac to track all of your activities and keep a record throughout the time you've used the Mac. Spotlight search is responsible for creating an index of all the files on the Disk and aware of all the changes done on the File or folder. Therefore, hiding the entire startup disk from Spotlight search is the right solution.
- Click on theApple logo.
- SelectSystem Preferences.
- SelectSpotlight.
- Clickthe Privacy tab.
- Locate'+' and click on it, to open the Finder window.
- While holding the Command key, press theUp Arrow button until the Macintosh HD is highlighted.
- Click onMacintosh HD and then clickChoose option.
- Accept the warning message, and clickOK.
However, these changes could create problems for you, like when you want to search a file in Finder; it won't show up because you've stopped Spotlight from indexing the disk on which your files are stored. At the same time, this can make the Mac much faster because the indexing process has been stopped. Hence, CPU Usage will be less.
Method 4: Group Files and Hide It
Do you want to get rid of certain files not appearing in the Recents folder on Mac? Then why not create a New Folder and move all the files that you don't want to see in Recents Folder, and then we'll exclude that particular folder from indexing.
- Create a New Folder.
- Move all of your files, pictures, videos, documents, etc., into that folder.
- Use theCommand + C to copy files.
- AndOption+Command+V to paste the files into the newly created folder.
- When you use Command + V to paste the files, the original version of that File still stays in that location, and hence it will appear under Recents.
- Once you're done with Moving Files into Folder, open the System Preferences.
- SelectSpotlight.
- Selectthe Privacy tab.
- Add that folder into Prevent Spotlight from searching these locations: box.
Method 5: Rename File
We don't see and know, but hundreds of hidden files are there in the macOS that backs up the system and provides reliable results. The MacOS uses a technique to hide the files; it can be done by adding a (.) dot at the beginning of the file name.
By reading this, you might be thinking of renaming the File in order to hide them. Unfortunately, the Mac won't let you add a dot at the beginning of the file name. But as usual, what we can't achieve in Finder, can be done with the help of Terminal App and its commands.
Tip: Press theCommand+Shift+dot (.) to see hidden files from Finder. Press the Dot key on the keyboard, don't press the dot letter keys.
You can rename the File that you don't want to see in the Recents of Mac by adding the dot in the beginning.
- Open theTerminal on your Mac.
- Navigate to the directory where that file is located, usethe cd command.
- Once you're in that directory, form a command like this:
- mv Filename.fileextension .Fielename.fileextension
- For example, mv image.jpg .image.jpg
- Hit return to execute the command.
Method 6: Move Files to Encrypted Drive
The last method to avoid files in Recents is to move them to Encrypted Drive, where Spotlight search cannot perform any indexing, and it will remain safe within Encrypted Drive.
- Go to theApplications folder.
- Find and openUtilities.
- There openDisk Utilities.
- Alternatively, press command + space bar and search Disk Utilities from Spotlight search.
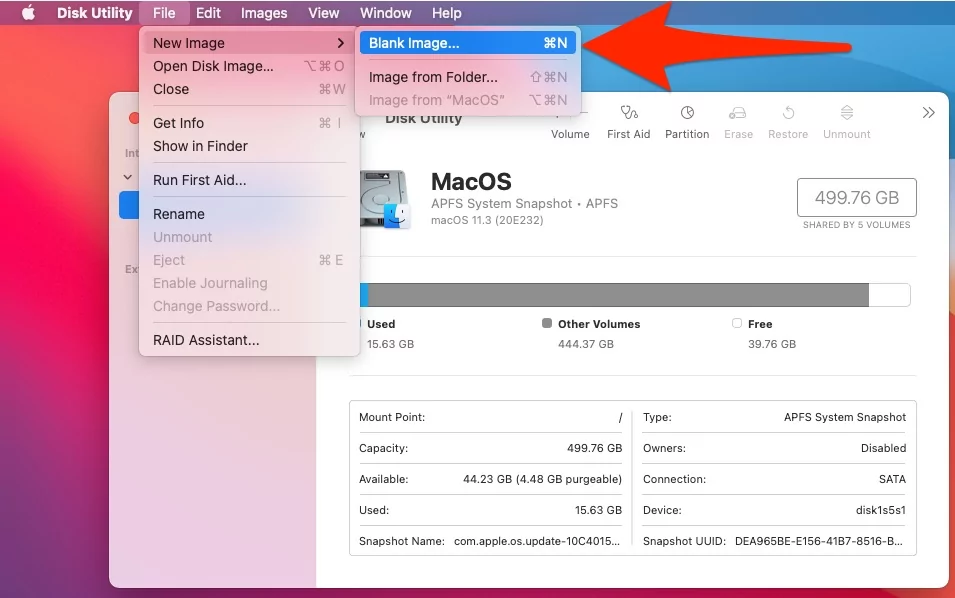
- Once you're inDisk Utility, click onFile in the top menu bar.
- SelectNew Image.
- SelectBlank Image.
- Now fill in all the required details and Save it.
- Make sure to selectread/write disk image inthe Image Formatoption.
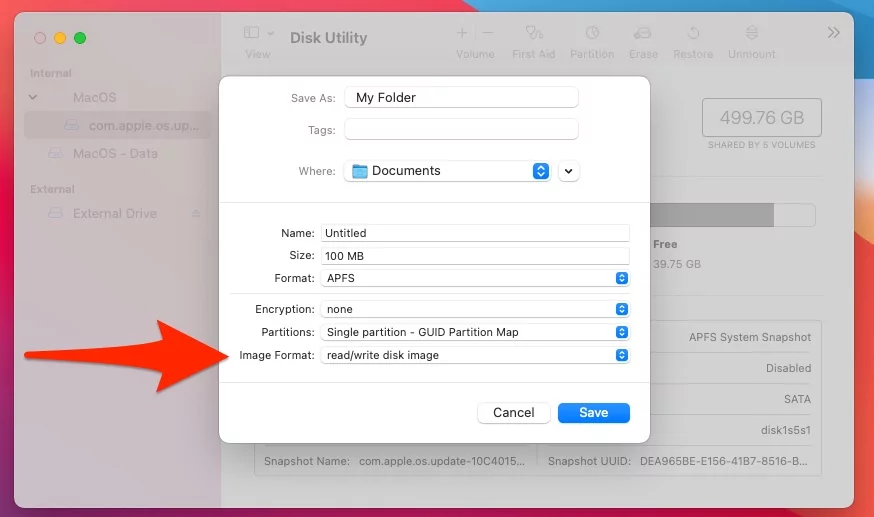
- That's it.
Mac Remove Recent items Dock
Likewise, you can get rid of applications sitting on the Mac Dock. If you don't like the crowded dock, then there are two ways to do it.
Method 1: Make Icons Automatically Disappear from Dock
By changing the settings, macOS will prevent the icons from appearing on the dock.
- Open theSystem Preferences on your Mac.
- Click onDock & Menu Bar.
- LocateShow recent applications in Dock anddeselect it.

- That's it.
Method 2: Remove Icons from Dock
If you want to remove the specific icon from the dock, then make sure to close it and then, with the help of a mouse, drag it to the desktop. This will remove the icon from the dock.
All above customisation and Tricks will help you to find the solution on Clear or Hide Recents Folder In Finder On Mac or MacBook.
jaysukh patel
Jaysukh Patel is the founder of howtoisolve. Also self Professional Developer, Techno lover mainly for iPhone, iPad, iPod Touch and iOS, Jaysukh is one of responsible person in his family. Contact On: [email protected] [OR] [email protected]
How To Clear Recents In Finder On Mac
Source: https://www.howtoisolve.com/how-to-clear-recents-folder-in-finder-on-mac/
Posted by: lebrunbagat1936.blogspot.com
0 Response to "How To Clear Recents In Finder On Mac"
Post a Comment